Vue 3 is out with exciting new features
 Photo courtesy of NASA
Vue 3 was officially released on September 18, 2020 with improved performance and some exciting new features.
Composition API
The Composition API is one of the most significant changes. It helps with logically grouping related fragments of components. In Vue 2, we used the Options API to pass various options during component configuration:
// src/components/ProductList.vue
<template>
  <div class="child">
    <h3>Vue2</h3>
    <div>
      <div class="add-product">
        <h2>Add Product</h2>
        <div>Name: <input name="name" v-model="newProduct.name" /></div>
        <div>Price: <input name="name" v-model="newProduct.price" /></div>
        <button @click="addProduct">Add</button>
      </div>
      <div class="search-product">
        <h2>Search Product</h2>
        <input name="name" v-model="filterText" placeholder="Start typing to search" />
      </div>
    </div>
    <div class="list-product">
    <h1>Product List</h1>
    <ul>
      <li v-for="product in filteredProducts" :key="product">{{product.name}}:{{product.price}}</li>
    </ul>
    </div>
  </div>
</template>

<script>
export default {
  data() {
    return {
      newProduct: {name: '', price: 0.00},
      productList: [
        {name: 'Milk', price: 2},
        {name: 'Carrot', price: 12},
        {name: 'Sugar', price: 8},
        {name: 'Cheese', price: 20}
        ],
      filterText: ''
    }
  },
  methods: {
    addProduct: function(){
      this.productList.push({...this.newProduct})
    }
  },
  computed: {
    filteredProducts: function () {
      if(this.filterText.trim().length > 0){
        return this.productList.filter(p => p.name.toLowerCase().indexOf(this.filterText.toLowerCase())>-1)
      }
      return this.productList;
    }
  }
}
</script>
This component’s functions have several responsibilities, and as the code grows more functions with different responsibilities will be needed, making it more difficult to understand and implement new changes. Moreover, the related parts of code are scattered throughout each component’s options (data, computed, methods).
The new Composition API enables us to organize related code. setup is a new component option in Vue 3, acting as the entry point for the Composition API. setup is executed before the component is created, and after the props are resolved, which means this cannot be accessed inside setup, but props and context can.
The following code uses the Composition API to recreate the earlier ProductList example component.
// src/components/ProductList3.vue
<template>
  <div class="child">
    <h3>Vue3 Composition API</h3>
    <div>
      <div class="add-product">
        <h2>Add Product</h2>
        <div>Name: <input name="name" v-model="newProduct.name" /></div>
        <div>Price: <input name="name" v-model="newProduct.price" /></div>
        <button @click="addProductToList">Add</button>
      </div>
      <div class="search-product">
        <h2>Search Product</h2>
        <input name="name" v-model="filterText" placeholder="Start typing to search" />
      </div>
    </div>
    <div class="list-product">
      <h1>Product List</h1>
      <ul>
        <li v-for="product in filteredProducts" :key="product">{{product.name}}:{{product.price}}</li>
      </ul>
    </div>
  </div>
</template>

<script>
import useProducts from '@/composables/useProducts'
import useProductNameSearch from '@/composables/useProductNameSearch'
import { ref } from 'vue'

export default {
  setup () {
    const newProduct = ref({name: '', price: 0.00})
    const { products, addProduct } = useProducts();
    const { filterText, filteredProducts } = useProductNameSearch(products)

    return {
      newProduct,
      addProduct,
      filterText,
      filteredProducts
    }
  },

  methods: {
    addProductToList: function(){
      // process product data before adding to list
      this.addProduct({...this.newProduct})
    }
  },
}
</script>
// src/composables/useProducts.js
import { ref } from "vue";
export default function userProducts(){
const products = ref([
{name: 'Milk', price: 2},
{name: 'Carrot', price: 12},
{name: 'Sugar', price: 8},
{name: 'Cheese', price: 20}
]);
const addProduct = (product) => products.value.push(product);
return {
products,
addProduct
}
}// src/composables/useProductNameSearch.js
import { computed, ref } from "vue";
export default function useProductNameSearch(products){
const filterText = ref('');
const filteredProducts = computed(()=>{
if(filterText.value.trim().length > 0){
return products.value.filter(p => p.name.toLowerCase().indexOf(filterText.value.toLowerCase())>-1)
}
return products.value;
})
return {
filterText,
filteredProducts
}
}The two functions using the Composition API are now in two separate files, imported by our ProductList component. Similarly, we can add more functions with isolated responsibility in different files and use them in our component. This will the make code easier to understand and to make changes to the component.
Take a look at the demo and source code if you like.
Summary
setup()is the entry point for composition API and can be used as a standalone composition function in a separate file. To learn more aboutsetupcheck out the Vue 3 docs.refcan be used to make a variable reactive, and.valueis used to access its value inside thesetupfunction.computedproperties can be created using the function imported from Vue..valueshould also be used here to access the value of computed properties.
There are more options, like lifecycle hooks, watch, and toRefs, which we don’t use in the above code.
- Lifecycle hooks can be used in
setupby prefixing withon. For example,mountedbecomesonMounted. Visit the docs to learn about all of the lifecycle hooks. - To setup
watchand know more about it read the docs. toRefsis another option which helps makepropswhich are passed to thesetupfunction reactive. To learn more visit the docs.
Teleport
Teleport is another interesting feature which helps in making our HTML structure cleaner and more logical. Previously when we wanted to use a global modal or a notification/alert, it required deeply nested code. With teleport, the placing of components in the required location is easier. Let’s take a look:
-
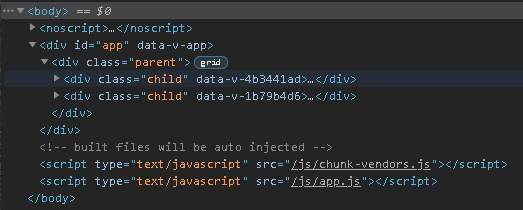
The screenshot below shows the rendered DOM (without teleport code), where the Vue app is inserted into the DOM in
div#app.
-
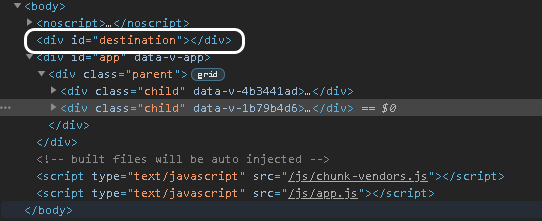
Now we are going to add
<div id="destination"></div>just above the Vue application. Thisdivis highlighted in the screenshot below. Notice that thedivwe added is outside of the Vue application.
-
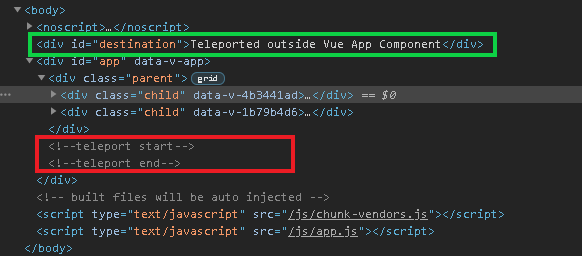
Now in the Vue component we will add
<teleport to="#destination">Teleported outside Vue App component</teleport>. This code uses thetoprop to pass a reference of which element to use as parent instead of the Vue app.
-
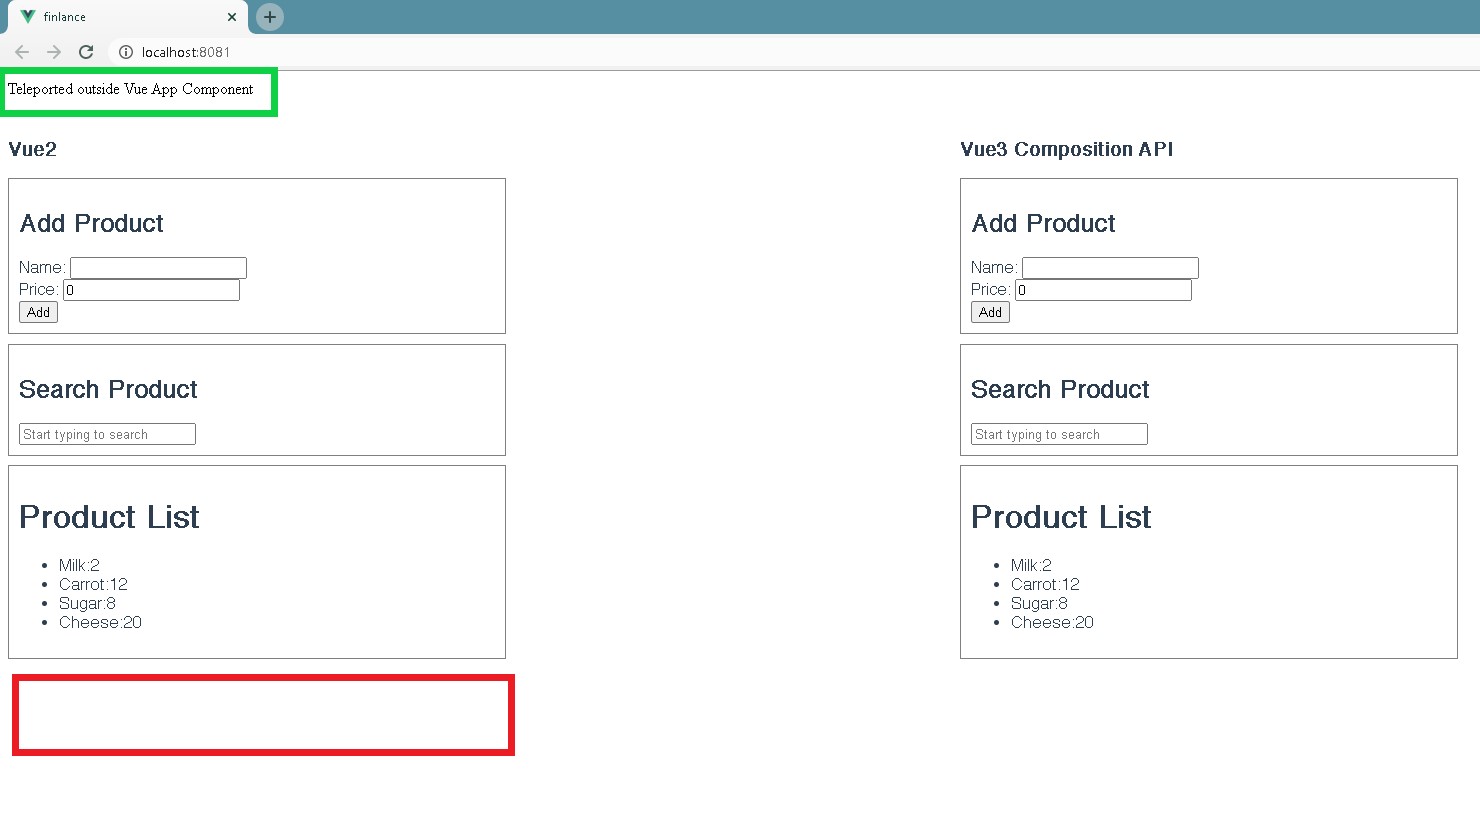
After adding the teleport code, we can see that its contents, “Teleported outside Vue App component”, are rendered in HTML outside the Vue app. Normally, it would be rendered in its place in the app (the red region) but due to teleport it’s rendered in the teleport destination (the green region).

-
We can see in the browser that the teleported code is at the top of the page rather than within the Vue app.

With teleport we can render a piece of HTML code anywhere in the DOM tree. Teleported code will render with the Vue component and even update with it when props change. Note that the destination should be outside the component tree.
Fragments
In Vue 2, multi-root components were not supported, so multiple components needed to be wrapped in a single <div>. But in Vue 3, having multi-root components is possible.
Vue 2:
<!-- Layout.vue -->
<template>
  <div>
    <header>...</header>
    <main>...</main>
    <footer>...</footer>
  </div>
</template>
Vue 3:
<!-- Layout.vue -->
<template>
  <header>...</header>
  <main>...</main>
  <footer>...</footer>
</template>
Emits component option
In Vue 2, props for a component are declared in props option, making it easy to see which props are being used. But for custom events, we had to search the whole component to see what events are used. Now, custom events can be declared just like props via the emits option. Since this option accepts object notation, validators for arguments can be defined similar to validators in the props option.
Below you can see that we are passing custom events from the parent component to the child component and using the emits option to declare the custom event in the child component.
// src/App.vue
<template>
  <div class="parent">
    <product-list />
    <product-list-3 @update-inventory="addToInventory"/>
  </div>

  <div id="inventory">
    <span v-show="inventory.length === 0">Inventory is empty.</span>
  <div v-show="inventory.length > 0">
    <h3>Inventory</h3>
    <ul>
      <li v-for="item in inventory" :key="item.name">{{item.name}}: {{item.price}}</li>
    </ul>
      Total: ${{inventory.reduce((acc,product)=>acc=acc+(+product.price),0)}}
  </div>
  </div>

  <teleport to="#destination">Teleported outside Vue App component</teleport>
</template>

<script>
import ProductList from "./components/ProductList.vue";
import ProductList3 from "./components/ProductList3.vue";

export default {
  name: "App",
  components: {
    ProductList,
    ProductList3
  },
  data(){
    return {
      inventory: []
    }
  },
  methods: {
    addToInventory(products){
      this.inventory = [...this.inventory, ...products];
    }
  }
};
</script>
// src/components/ProductList3.vue
<template>
. . .
<div class="list-product">
<h1>Product List</h1>
<button @click="updateInventory()">Update Inventory</button>
<ul>
<li v-for="product in filteredProducts" :key="product">
{{ product.name }}:{{ product.price }}
</li>
</ul>
</div>
. . .
</template>
<script>
import useProducts from "@/composables/useProducts";
import useProductNameSearch from "@/composables/useProductNameSearch";
import { ref } from "vue";
import ChildComponent from "./ChildComponent.vue";
export default {
components: { ChildComponent },
emits: ["update-inventory"],
. . .
methods: {
. . .
updateInventory: function() {
this.$emit("update-inventory", [...this.filteredProducts]);
this.emptyProducts();
}
. . .
}
};
</script>Some breaking changes from Vue 2
- New method in the Global API,
createApp. Calling this returns the app instance which can be used to mount the root instance.
Vue 2:
import Vue from 'vue'
import App from './App.vue'

Vue.config.productionTip = false

new Vue({
  render: h => h(App),
}).$mount('#app')
Vue 3:
import { createApp } from 'vue'
import App from './App.vue'

createApp(App).mount('#app')- Global API methods like
nextTick,set,observableand others are now restructured with tree-shaking support.
Vue 2:
import Vue from 'vue'

Vue.nextTick(() => {
  // something DOM-related
})
Vue 3:
import { nextTick } from 'vue'

nextTick(() => {
  // something DOM-related
})
Here is a list of more breaking changes.
Many Vue libraries are yet to implement the changes that would work with Vue 3. For example, we use Vuetify in various client projects and this is not supported in Vue 3 as of writing this blog. There is a roadmap planned for Vue 3 support in Vuetify, with the alpha release in Q4 2020 and target release in summer 2021.
For information about migrating Vue 2 projects check out the migration guide.

Comments