Writing a WebSocket-Controlled State Machine

By Will Plaut
July 20, 2024

This article was co-authored by Jacob Minshall
We recently developed a state machine to control a piece of software for a client. The client wanted to have an API to interact with the state machine, triggering state changes while it was running. Depending on the current state’s requirements, the state machine could either wait for a WebSocket message to proceed to another state or transition to the next state without outside input. WebSockets allow for two way communication so the clients can also have visibility into the state machine’s current state.
To start, we looked for a simple way to implement a state machine within our TypeScript/Node.js based project. The typescript-fsm library on GitHub was a good solution for us. What made us consider this package was the simplicity of the library: the entire source file is around 100 lines of code.
We did end up making some custom changes to the library that won’t be shown here; for example, we wanted to broadcast state change messages via WebSockets to any connected clients. With such a simple library, it was a breeze adding that code. The code in this post will still run with the vanilla library, it just won’t notify you when the state changes.
Here’s a simple example of a state machine that manages a car’s door (borrowed from the typescript-fsm README, with some modifications). It can be opened or closed, but it can also be in the middle of opening and closing as well. If the door is closed, you can’t close it again. If it’s opening, then trying to close it will have to wait until the door has finished opening.
As a side note, state machines lend themselves well to diagrams. These help developers and clients see and understand the code at a high level. PlantUML has worked well for us. Our door diagram is below:
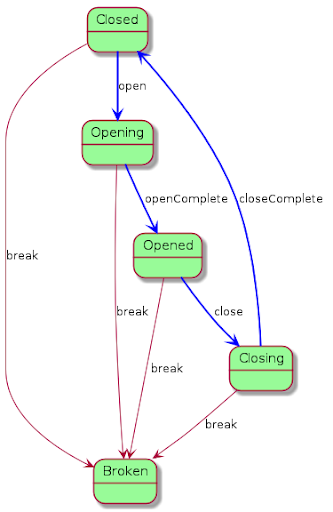
Let’s break down the door state machine first, then the WebSocket control after.
// Use our customized version of typescript-fsm
import { t, StateMachine } from "./stateMachine";

enum States { closing = 0, closed, opening, opened, broken };
enum Events { open = 100, openComplete, close, closeComplete, break };
We start by creating the basic states and events. These are each just enums that will be used when checking the current state and moving from one state to the next.
// lets define the transitions that will govern the state-machine
const transitions = [
  /* fromState        event                 toState         callback */
  t(States.closed,    Events.open,          States.opening, onOpen),
  t(States.opening,   Events.openComplete,  States.opened,  justLog),
  t(States.opened,    Events.close,         States.closing, onClose),
  t(States.closing,   Events.closeComplete, States.closed,  justLog),
];
Here the transitions are defined. This is a list of tuples that define the state machine. First is the starting state where an event can occur. Next is the events that will cause a state transition to happen, and then the state that will be transitioned to. Finally there’s the callback that is called as part of the transition. It’s not shown here, but one state may have multiple transitions, for instance if you wanted the closed state could have an event called “lock” that moves to the state locked, that way while in the closed state you the door would respond to either the “open” event or the “lock” event.
// initialize the state machine
const door = new StateMachine<States, Events>(
   States.closed,   // initial state
   transitions,     // array of transitions
);
This is how the state machine itself is created. The enums are passed to the machine so it knows what states and events there are, then the transitions and starting state are supplied to the constructor, and the new state machine is returned. Multiple doors can be created; each door object would have a “dispatch” method attached to it to send the events that are happening to that specific door.
// transition callbacks - async functions
async function onOpen() {
    console.log("onOpen...");
    // actually open the door

    // waiting 5 seconds and then pretending the door has been opened
    setTimeout(() => {door.dispatch(Events.openComplete);}, 5000);
}

async function onClose() {
    console.log("onClose...");
    // actually close the door

    // waiting 5 seconds and then pretending the door has been closed
    setTimeout(() => {door.dispatch(Events.closeComplete);}, 5000);
}

// synchronous callbacks are also ok
function justLog() {
    console.log(`new state is: ${States[door.getState()]}`);
}
These are basic callbacks to use as an example. When opening or closing the door, the script will wait 5 seconds and signal a completion of either event, changing the state automatically. This means some of the state transitions are internal to the state machine rather than external. Once the door has begun opening, the user is no longer in control of when it has finished opening, they just have to wait for it to be in the opened state. A door will never start closing on its own with this implementation, so some outside source will need to initiate the closing/opening process.
Make sure you have the
wspackage installed via NPM:npm install ws. You also need the@types/wspackage for WebSocket type definitions:npm i --save-dev @types/ws.
import WebSocket from 'ws';

console.log("creating websocket server");
let ws = new WebSocket.Server({port: 9091})

ws.on("connection", (socket: WebSocket) => {
    console.log("you are connected to the websocket");

    // handle a message coming in on this websocket
    socket.on("message", async (message: string) => {
This creates the WebSocket, puts it on port 9091, and then starts to define what to do when it gets a message.
        // message is JSON
        let msg = JSON.parse(message);

        // if there's an event inside the message handle it
        if (msg.event) {
            let event: number = msg.event;

            // check if the state can happen according to transitions available
            if (door.can(event)) {
                // dispatch that event to kick off the state transition
                await door.dispatch(event);
                // return to the websocket the current state
                // if open is sent, opening will be the new state
                // that is returned
                socket.send(JSON.stringify({
                    current_state: door.getState()
                }))
Here the message sent by the client is parsed into JSON. If there’s an event requested, we check if the door can handle that event. This means that when the door is in the opened state and the open event is sent we won’t try to dispatch that event. The dispatch call is the way the state machine requests a state change. Internally, it also checks to see if the event is possible.
            } else {
                console.log(`error, bad event sent ${event}`)
                socket.send(JSON.stringify({
                    error: `bad event sent ${event}`,
                    current_state: door.getState()
                }))
            }
        } else if (msg.current_state) {
            socket.send(JSON.stringify({
                current_state: door.getState()
            }))
        }
    });
});
Another option in the API is a simple check of the current state. If the message sent has a field that has the key current_state then the current state is returned on the socket.
The car door example is a simple use case; the state machine that we wrote for our client has 15 different states and 36 different transitions. Adding and changing states has proven fairly easy and the states themselves provide nice ways to encapsulate fairly complicated behaviors. This encapsulation has eased the cognitive load required to work on the codebase, so we will definitely keep this in our tool bag for future projects.
Comments