Reducing page load times: Cloudflare and caching with ASP.NET

When designing the architecture for a new website, it’s important to keep caching in mind. Caching allows you to store a copy of the pages or resources used by your web application in your local browser. Content distribution networks such as Cloudflare also leverage cache directives to distribute content to users more efficiently.
If we are going to use response caching on our web application, we should not include anything that depends on the identity context for the user in the page content in the response. Instead, we should render the same content to every user that hits the same URL. If we include any identity-specific content, the CDN will reuse it for other requests, which is a security and privacy risk.
A simple example is an ecommerce site where the customer logs in to make a purchase: If the homepage shows the user name and icon at the top bar, that content should be rendered from a non-cached request. Otherwise, CDN caching will show the same user and icon to other visitors. And worse: depending on the validations applied to the website, the profile page could even display personal information to other users!
When dealing with these situations, I often rely on asynchronous requests to a set of non-cached API endpoints to retrieve the identity information, and process it on the frontend to render the user-dependent content.
Adding response caching
In .NET Core, we have a simple way of adding response caching to an ASP.NET application. Let’s see how easy it is to enable caching on a Razor Pages app. First, in our Program.cs file, we need to add a couple lines:
+ builder.Services.AddResponseCaching();

var app = builder.Build();

+ app.UseResponseCaching();
Second, we need to include the [ResponseCache] attribute on our action methods to specify the caching options for that request. In the example below, we are adding a response cache directive of 30 seconds that will vary depending on the User-Agent header sent with the request:
+ [ResponseCache(VaryByHeader = "User-Agent", Duration = 30)]
public async Task<IActionResult> OnGet()
{
    return Page();
}
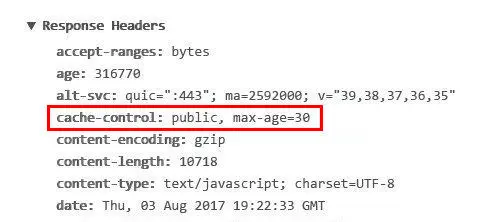
To test the new logic in place, we can navigate to the page in Chrome and review the response headers in DevTools. We should set the cache-control header to public, with the max-age attribute set to the duration in seconds we specified.

Using Cloudflare to distribute cached content
Once we have our cache responses configured, we can leverage Cloudflare to store our cached responses in the CDN, and improve our page load response time for the user while decreasing the number of requests to our server. Win-win!
By default, dynamic content is not cached in Cloudflare. This is a default configuration to avoid security implications: Cloudflare will disable caching on certain content type and file extensions (such as HTML, or in our case, ASP.NET pages). That means that once we deploy our web application and test it with the CDN active, we will get a response header similar to this:

The cf-cache-status header is a custom header added to the response by Cloudflare that indicates whether the content was cached by the CDN. In this case, we got the value DYNAMIC, meaning that Cloudflare does not consider the content eligible to cache.
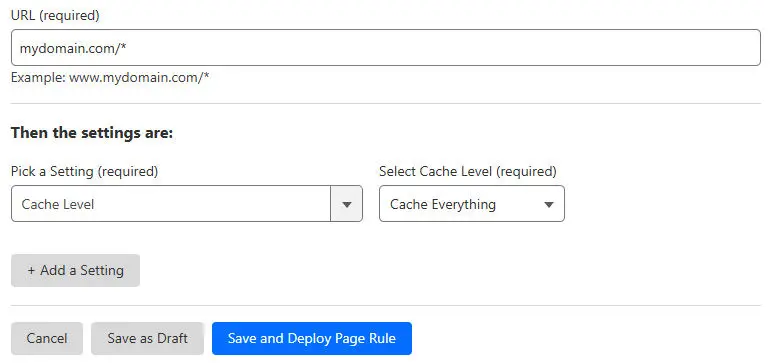
To enforce caching, we need to add some additional rules: On Cloudflare’s dashboard, let’s select our website and, on the left nav, go to Rules → Page Rules. We will open a section where we can add custom rules that will apply to specific URL patterns. Here, I usually create two rules:
-
A page rule that will cache everything on the website. This rule will tell Cloudflare to cache dynamic and static content on the CDN. This is reasonable since we are aware of the implications of caching our pages, and already made the changes neccesary to avoid caching identity-related data.

-
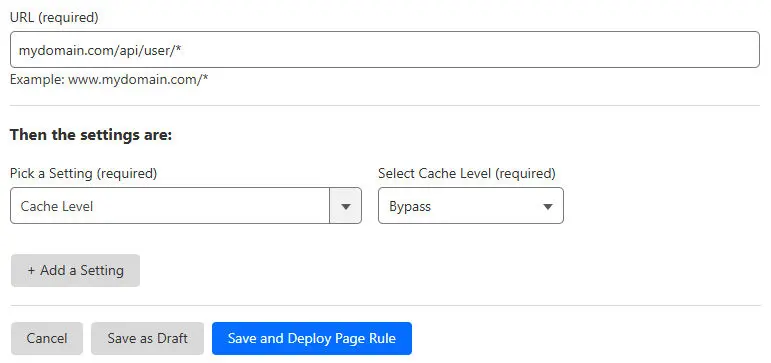
A second page rule that will skip caching completely on the location where we will be delivering identity-specific content. For example, any API endpoints that will return the user details to be displayed at the top bar, or the user profile page, should be bypassed by the CDN. In our example, those API endpoints are inside the
/api/user/*location.
Note: It’s important to set this rule to the first position in the list, so it’s not overridden by previous rules that were deployed.
Testing
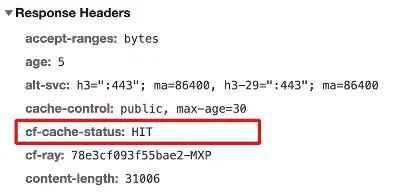
After saving and deploying both rules, it’s time to test the results. When we navigate to our website’s homepage with Chrome, we will see the updated response headers:

The “HIT” value means the request hit a cached version of the resource in the CDN.
And finally, we should test the response headers on our identity-related API endpoints.

Yes! We’re getting a BYPASS value for the cf-cache-status header, meaning Cloudflare is not caching any content from that URL.
All right! This is as far as it goes for this post. Now, we have our ASP.NET pages cached, and Cloudflare is distributing the cached version through the CDN, reducing the number of requests to our servers and decreasing the response times for the user. Of course, this is just the tip of the iceberg; we can also add caching for assets and external resources, specify different strategies and durations for each resource type, and more. All that is material for upcoming blog posts.
dotnet aspdotnet csharp cloudflare

Comments