Writing a WebSocket-Controlled State Machine

By Will Plaut
July 20, 2024

This article was co-authored by Jacob Minshall
We recently developed a state machine to control a piece of software for a client. The client wanted to have an API to interact with the state machine, triggering state changes while it was running. Depending on the current state’s requirements, the state machine could either wait for a WebSocket message to proceed to another state or transition to the next state without outside input. WebSockets allow for two way communication so the clients can also have visibility into the state machine’s current state.
To start, we looked for a simple way to implement a state machine within our TypeScript/Node.js based project. The typescript-fsm library on GitHub was a good solution for us. What made us consider this package was the simplicity of the library: the entire source file is around 100 lines of code.
We did end up making some custom changes to the library that won’t be shown here; for example, we wanted to broadcast state change messages via WebSockets to any connected clients. With such a simple library, it was a breeze adding that code. The code in this post will still run with the vanilla library, it just won’t notify you when …
javascript typescript
Using Docker Compose to Deploy a Multi-Application .NET System

By Kevin Campusano
July 13, 2024

This post was co-authored by Juan Pablo Ventoso
We recently developed a system that involved several runtime components. It was an ecommerce site that included a database, a web API, an admin control panel web app, and a frontend SPA.
There are many ways to deploy such a system. For us, we wanted the infrastructure to be easily replicable for multiple environments with slightly different configurations. We wanted to be able to have, for example, a production and a staging version that could be deployed easily, with minimal configuration changes. We also wanted the infrastructure to be captured in files and version controlled, to further help replicability and maintainability.
With all that in mind, Docker Compose seemed like an ideal option. We could author a series of configuration files, parameterize environment-specific changes and, with a single command, we could spin up a whole environment to run the various applications within the system.
In this blog post, I’ll explain how we did that using a demo .NET code base that has a similar set of components. Let’s get started.
Getting familiar with the demo project
In .NET terms, our demo code base is organized as a …
dotnet aspdotnet csharp docker nginx
Introduction to Nuxt3 and Rendering Modes

By Bimal Gharti Magar
July 12, 2024

Nuxt is a free and open-source framework which helps us build performant full-stack web applications and websites with Vue.js. Nuxt is built on top of Vue, so it is also called a meta-framework. Nuxt uses conventional style directory structure to streamline repetitive tasks and allow developers to focus on more important operational tasks. The configuration file can be used to customize the default behaviors.
Nuxt3 features
-
File-based routing. Nuxt generates routes based on the Vue files and folder structure within the
pages/directory. For example, if we have apages/contact.vuefile, Nuxt will generate a corresponding route at/contact. It also supports dynamic routing:pages/product/[sku].vueincludes the route/product/APPLE, giving the[sku].vuesingle-file component access to the valueAPPLE. -
Auto-imports. Components, composables, and helper functions have their respective directories which can be used across the project without importing them. This feature enhances the developer experience by removing the long list of imports. Nuxt also supports automatic importing of Vue APIs. It can be configured to import third-party packages using the
nuxt.configfile. Auto import …
javascript vue frameworks
Uploading multiple files in a single request in an ASP.NET Core application
By Kevin Campusano
July 4, 2024

We recently developed a web application for maintaining an ecommerce site’s product catalog. Unsurprisingly, one of the features involved the management of product images. Specifically, we wanted to create a page where all the images of a given product were displayed and new ones could be uploaded.
In addition to that, this wasn’t a single-page application. We weren’t using a JavaScript framework and instead were relying on regular server-rendered views with ASP.NET Razor Pages. Even so, we wanted to create a user experience with a good balance of usability and development complexity. So, we decided to create the capability of uploading several image files at once within a single request — that is, within a single HTML form submission.
In this article, I’m going to describe the solution that we came up with in order to make this happen.
To demonstrate the approach, I’ll use a sample ASP.NET Core solution that I’ve been building out throughout several blog posts. Its main feature is calculating the value of used cars and offering quotes for them. The system stores all generated quotes as database records. Given this context, we’ll add the …
dotnet aspdotnet csharp
Secure Your Dockerized Nginx with Let's Encrypt SSL Certificates

By Jeffry Johar
June 27, 2024

Photo by Animesh Srivastava from Pexels.
In this tutorial I will demonstrate how to secure Nginx on Docker using HTTPS, leveraging free certificates from Let’s Encrypt. Let’s Encrypt certificates provide trusted and secure encryption at no cost, although they require renewal every 90 days. Fortunately, this renewal process can be automated with various tools. We will use acme.sh, a versatile Bash script compatible with major platforms. The tutorial will guide you through obtaining Let’s Encrypt certificates on the host system and mounting them as a volume in the Nginx container. Please ensure the following prerequisites are met before proceeding:
- Working Docker Engine
- Working domain name
- A host with ports 80 and 443 that is accessible from the internet
1. Domain validation
First, we need an Nginx instance on Docker that will expose port 80 and have a directory on the host mounted for its web root. This is required by acme.sh for its file-based domain validation. I’ve prepared a Docker Compose file (docker-compose.yml) and an Nginx configuration file (nginx.conf) for this purpose. Git clone the following repository and change into the directory
git clone …docker linux nginx tls security
Practical Linux Command Line Tips for Productivity and Efficiency

By Edgar Mlowe
June 22, 2024

Feeling stuck with basic Linux commands? You’re not alone! Many people know some commands but don’t feel efficient. The good news is that with some know-how and common commands, you can transform your skills.
In this post, you’ll learn to combine commands with pipes, master shell techniques, efficiently recall and edit past commands, and navigate the filesystem with speed. Let’s dive in!
1. Combining Commands with Pipes
Understanding How Pipes Work
Ever wish your commands could work together? Pipes make it happen! They let one command pass its output to another, creating a smooth workflow.
Commands take input (stdin) and give output (stdout). The pipe symbol (|) links them, making life easier.
For example, ls -l /bin lists files in the /bin directory, but the amount of output is overwhelming. Try ls -l /bin | less to view one screen at a time—like having a personal organizer! This command pipes the output of the ls command into the pager less, which is very useful for reading large amounts of data.
Let’s dive into pipes and practice them with commands like wc, head, cut, grep, sort, and uniq to handle data like a pro. If any of these commands are new to …
linux shell tips
Docker and iptables
By Jeffry Johar
June 12, 2024

Photo by Egor Kamelev from Pexels.
Docker utilizes iptables for its networking and routing. Blocking and accepting connections to the running containers on a host might be tricky at first if we are not aware of where Docker puts its chains. Docker chains are all located in the iptables FORWARD chain. Within this chain, Docker provides a convenient chain named DOCKER-USER for users to add their custom rules.
One common mistake is attempting to block Docker Containers at the iptables INPUT chain, which will not work. This is because Docker does not pass through the INPUT chain, it only passes through the FORWARD chain. The following diagram illustrates a simplified chains traversal of Docker containers.
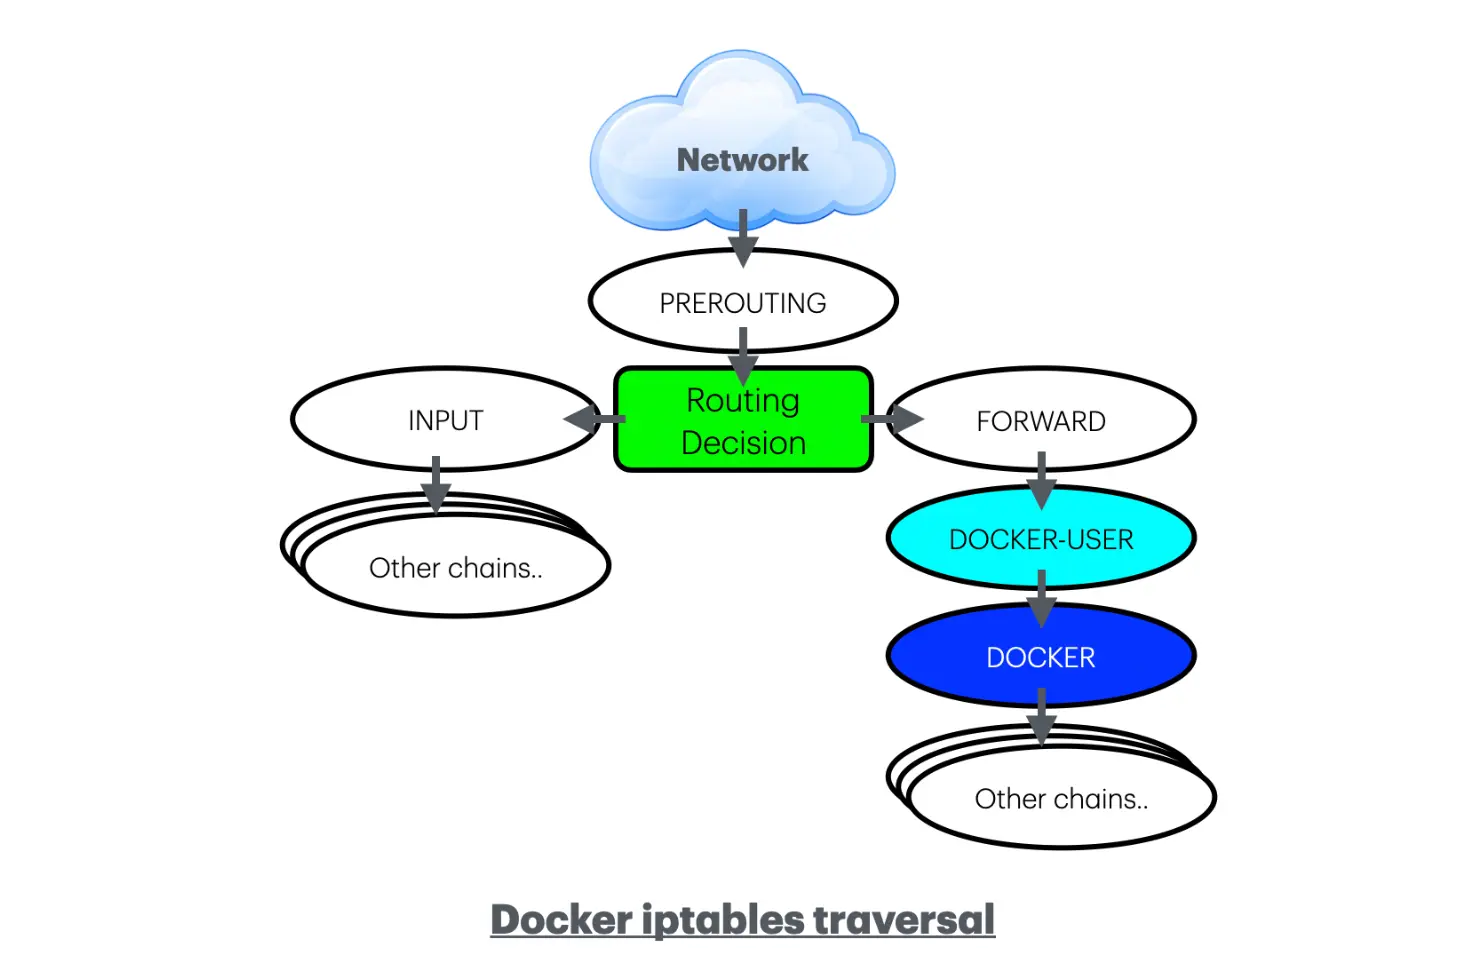
Below are a few working examples of iptables rules that can serve as references. These rules will be applied to the DOCKER-USER chain. It’s important to note that the DOCKER-USER chain comes after the PREROUTING chain and FORWARD chain, so we’ll need to use the iptables conntrack module for getting the information about source addresses and host ports. iptables conntrack extension allows iptables to track the state of network connections passing through the system. This …
docker linux iptables redhat
End Point’s CasePointer business acquired by Deloitte

By Rick Peltzman
June 3, 2024
We are proud to announce that Deloitte has acquired the industry-leading public health disease surveillance business, CasePointer, from End Point Corporation as of June 1, 2024. This acquisition brings to Deloitte, End Point’s experienced and skilled software engineers, cloud developers, DevOps engineers, epidemiologists, and former public health officials.
Since 2008, End Point’s CasePointer business has worked with open-source public health software to modernize tools, automate processes, improve the user experience, and provide better return on investment to state and local public health agencies for their disease surveillance and epidemiologic needs.
Jon Jensen, End Point’s former chief technical officer, has joined Deloitte with this transaction. He said: “We are excited to work with Deloitte’s team of professionals and serve their broad client base. Together, we expect to make an even greater impact for government health organizations.”
Deloitte is only acquiring assets, clients, and personnel related to End Point’s CasePointer business. All other business lines remain with End Point, including systems administration, database engineering, e-commerce programming, application …
casepointer company epitrax emsa